Saturday, January 27, 2018

Get more time for your FLES program!

I often get questions about my schedule from other FLES teachers. It's funny that when I tell high school teachers how many students I have (520) and that I see them for 25 minutes every other day, I get looks of horror. But when I tell other FLES teachers the same they want to know how I got so lucky and what did I do to get that schedule. I didn't always have it so good...


Here's what my schedule has looked like over the last six years.

Year 1 - Spanish was in the Specials rotation and on a cart. I taught K-5 once every 6 days for 55 minutes. It was horrible. Students would forget what I had taught the last time I saw them. I didn't have a curriculum and I realized later that I was going too fast and expecting too much.

Year 2&3 - Spanish was still in the Specials rotation but I convinced my admins that it would be better for the students if I saw them twice in the 6 days. I switched with Library one year and Computer Lab the other. Halfway through the 55 minutes me and the other Special Area teacher would swap classes. A fourth grade teacher remarked that she could tell a difference in how much Spanish the students could speak after making this change.

Year 4&5 - We lost population and we switched from a 6 day rotation to a 5 day rotation. Someone needed to come out of the schedule. I begged my admins to please let it be me. My vice-principal told me to propose a schedule and she would consider it. I came up with a A/B schedule where I saw 2nd-5th grade for 25 minutes every other day and K-1st for 15 minutes every other day. I was on the cart for K-1.

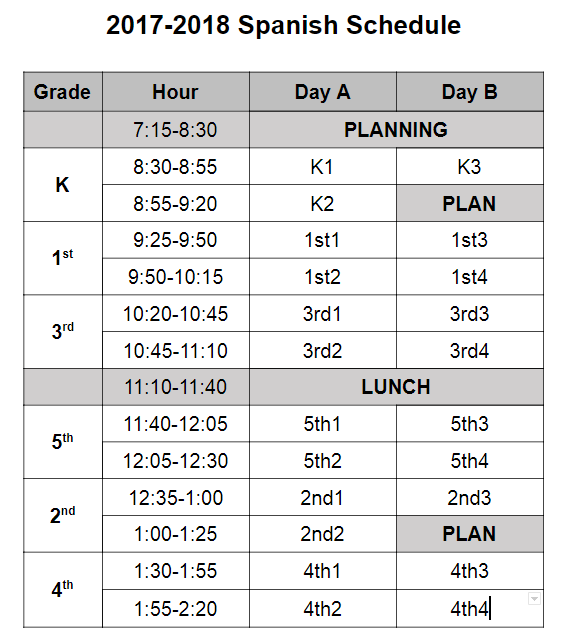
Year 6 - I see everyone for 25 minutes every other day. I get an hour of plan during the instructional day on Day B and none on Day A so instead of doing morning duty I use that as my plan time instead, which I am happy with since I actually end up with a little extra time. Here's what it looks like today. You can see that I don't get any time between classes within a grade level so one class is leaving as another is coming but I do get 5 minutes between grades to reset and get ready.


Advice for other teachers:

1. If you are in a schedule like my first year where you only see your students once a week or less then work to convince your admins to let you switch with another class. I was lucky that my PE and Music teacher were already doing this so there was precedence at my school for this arrangement. If you don't have this at your school try starting with Music or PE. The motor skills that they teach in those classes also benefit from seeing the students more frequently. Art, STEM, and Library are not usually good candidates because getting out/putting up supplies and checkout takes up a lot of time and these teachers usually want the full time.

2. Take baby steps and educate your administrators on how proficiency works. I didn't go from once every 6 days to every other day. We worked up to that as my administrators saw my students improving in their Spanish proficiency. They saw how the increased frequency was working and were willing to give me more time.

3. Be flexible and creative. My A/B schedule would not have worked those first few years because we simply had too many students. When it did make sense I had to get creative and be willing to do 15 minutes on a cart with younger grades. It wasn't ideal but I made it work. In fact, I had a first grade teacher tell me I put them to shame with how much I got done in 15 minutes.

4. Be realistic. There's no way my current schedule would have worked those first few years because our school was so big that I didn't even get my own classroom until my third year. Only because of redistricting and an aging population in our district has allowed me to have more time. You have to do what works for your school and your population. I was also extremely lucky to have a supportive admin in charge of scheduling. If your admin isn't on board right away it might take more time to win them over.

5. Be flexible...like really really flexible. Yes, I said be flexible already but I'm saying it again because it's that important. Now that I'm out of the Specials rotation I have kids pulled out of my class ALL the time. We try our best to make sure everyone gets Spanish but some kids come late from intervention, some Special Ed kids don't come because they have to have so much time in the resource room, some get pulled on Thursdays and Fridays for gifted and talented. MAP testing sometimes conflicts with my class. I'm okay with all of this because I'd rather see most of the students every other day. Also it's not much worse than what I experienced when I was in the rotation. It's just the life of a FLES teacher.

6. Always be advocating for your program. You won't get more time if the admins, classroom teachers, and families don't love your program. Make sure your students' learning is visible. Put in the hallway, send it home, teach lessons that your students go home talking about, invite all stakeholders into your classroom.

7. Stay positive. Being a FLES teacher with large numbers of students and not a lot of contact time is hard but by staying positive I have been able to enact change at my school.  Every year I think, "Wow! This is so awesome. It can't be better than this!" But then it gets better. And let's be honest any time in the target language is better than no time so keep that in your mind while you work to get MORE time.


So that's how I got to see my students every other day. And I'm chewing on an idea to see even more of my older students and maybe even the preschoolers at my school next year. How often do you see your students? What do you do to get more time with them? Share in the comments below!

Saturday, January 13, 2018

Green Screen in the Elementary Spanish Classroom

Last year on career day a guy came from KET, our local PBS station, and did a presentation on green screen. As we were cleaning up from career day I noticed that there were a bunch of green plastic table cloths.  Instead of putting them in the trash I gathered them up and put them in a drawer with the hope of finding a use for them later. And then this fall during our weather unit in 1st grade I decided to give green screen a try!

Here are six tips to get you started...


1. Download the Do Ink Green Screen app for ipad or iphone. I have a teacher ipad but it's a huge pain to get the school to buy apps for it so I signed in with my personal itunes account and bought it myself. At $2.99 it was totally worth it! There is another version that costs more and has more capabilities like drawing and animation but if you just want green screen, stick with the cheaper version.


2. Get a green sheet from Goodwill or green plastic table cloths from Wal-Mart. Or steal  re-purpose them from an event like career day like I did. ;-) Set it up in your classroom, preferably somewhere that you won't have your back to the room. This was not the case for me this year but I had my student teacher taking the videos while I kept an eye on the rest of the class. Next year if I'm alone I will set it up so I can do the video AND still have eyes on everyone. My first graders are usually pretty good but they're also not angels.

3. Model for students how to make a video. We chose a few students one class who chose which weather they wanted and then made a video that I projected onto the SMART board using my air server. The kids got a BIG kick out of watching their classmates and it made them super excited to make their own while at the same time showing them the format and expectations. 

Model how to do the video with the whole group before having students make individual videos


4. Set up an area where students can practice. I did this by putting two velcro squares on my cabinet, putting a pretend microphone, and weather and day cards in a basket. Students took turns being the weather reporter while the other kids sat on the bean bag chair and watched the "TV."

Students practice before doing their green screen video

5. Give the other students something to do. The first time we had students spelling the weather words with magnetic letters and the second time through we gave them pencils, crayons, and weather forecast worksheets to let them get some presentational writing practice in while they waited. It's crucial that there is something for students to do while they wait their turn to make their video. Antsy and impatient students are the ones who misbehave.

6. Decide what you will do with the finished videos. A hundred videos was too much for me to look at and edit (and also somehow the first time they didn't save) so we let the students watch their videos immediately after making them and that was that. No worries about trying to make them nice or having enough storage space. We did two rotations so students got to make two videos. If you  have fewer students then you could have them edit them in computer class or just make them into QR codes and display them for parents to view. 


Other notes:  If you have a class set of ipads and/or older students it wouldn't be necessary to have stations. You could model how to make the videos and then let students make and edit their own. I only have the one ipad but I think it worked to have students doing other things at different stations. I don't often do centers or stations but this format was one of the first time it really worked for me. Partly because students knew if they were off task or misbehaving at one of the other centers they would not get to make a video so that was enough for them to stay on task. 


My first graders had such a great time making their videos and I can't wait to come up with more ideas on how to use green screen in my classroom. Do you use green screen? What do you have your students do? What classroom management strategies do you use when you are making green screen videos? Share in the comments below!

Friday, January 5, 2018

Adorable First Grade Illustrations

Is there anything more precious than little kid drawings? If you answered no then you might be an elementary school teacher. 

My post on Places Around the School - Six Ideas for the FLES Classroom was already chock full of pictures but I just had to post up close pics of their illustrations on the large map we hung in our front hallway for our Spanish Speaking visitors.

This was a group effort by students from all 4 first grade classrooms.
This is the STEM lab. Check out the two students sitting at the table with a beaker of something green and smoking in between them. The other stick figure is our STEM teacher Ms. Napier. She's the only teacher that made it onto the map.
I would say this was me but it's in the wrong place on the map so I'm going to go with this is a student speaking Spanish in their sala de clase. 
I love the swings, the slide, the mud, and the four different suns. ¡Está super soleado!


Not pictured is a guitar in la clase de musica, lots of books on bookshelves in la biblioteca, a lone student eating lunch in la cafeteria and a house across the street. Also lots of very creative coloring. For the record our STEM lab is not green and purple striped.

What adorable drawings have your students made? Share in the comments below or on Twitter using the hashtag #earlylang!


Places Around School - Six Ideas for the FLES Classroom

I have a new curriculum this year (as opposed to no curriculum before) and while there are many units I was already teaching there are several that I have never taught before. One of those was a unit for first grade on the different places in school called Me and My School. I'm not sure why I never taught places in the school before but it has turned out to be one  of my favorite units so far. Here are 6 great ideas that my students loved.


1. We stared the unit with Pete the Cat Rocking in My School Shoes. Just like with Pete the Cat I Love My White Shoes I "read" this book to them (translating and simplifying as I went while showing them the pictures.) Then we told the story again with the awesome story props from kizclub.com. I recommend printing, laminating, and putting a magnet on the back for easy story telling. 


2. From the book, we came up with a chant that helped students connect different actions with the different places in the school. 

Leo, leo, leo, leo en la biblioteca.
Como, como, como, como en la cafeteria.
Juego, juego, juego, juego en el patio.
Canto, canto, canto, canto en la clase de musica.
Pinto, pinto, pinto, pinto en la clase de arte.
Escribo, escribo, escribo, escribo en la sala de clase.

3. Then we practiced the different locations with my lovely llama, Primavera (named by second graders who were studying seasons at the time.) I took close up pictures and wide angle pictures of Primavera around the school and the kids had to guess where she was. I got this idea from someone on either Facebook or Instagram (sorry I can't remember who!) 


llama en la clase de musica


4. Next we hid pictures of Primavera around the school and my student teacher Sarah Beth took half the class on a llama hunt. Students had to find the right place on their list and mark if they found the llama or not. This was another big hit but we did annoy the Music teacher with kids constantly peeking into her room to see if they could find Primavera. The other half of the class stayed with me and played memory with school supplies flash cards. 

Tip - If you do this make sure you put the pictures outside of a classroom so that students don't need to go in. We did this but even then the kids were very "thorough" so you might also warn your teammates. 

lugares alrededor la escuela


5. Battleship with bear counters and simplified versions of our school map was also super fun and got in some interpersonal practice with ¿Dónde está? and the different locations. 


map of the school battleship game


6.Our final project had students labeling both smaller individual maps and making a larger map that we hung in the front hallway for our Spanish speaking visitors. Giving the students this authentic audience really motivated them and they worked really hard to label their maps. Check out my separate blog post on the adorable illustrations they made for our large map. 

Tip - Make copies of the maps that you put out for visitors so that students can have their original to take home. Sending home work with students, especially work they are excited about is a great way to advocate for your program.

mapa de la escuela proyecto


mapa de la escuela proyecto

This has been one of my favorite units ever. The students were so engaged and learned so much. Do you teach places around the school and what activities do you do? Share in the comments below or on Twitter using the hashtag #earlylang!