Pages

Saturday, November 18, 2023

Using Beebots in Spanish Class

 My third graders last year learned about places in the community and how to give directions around town - so the perfect excuse to borrow the beebots from the STEM Lab!

We started with learning places in the community with the game ¿Dónde está mi perro? I told the class my dog had escaped and we needed to find her. They had to guess where in the city she had ended up. It's a great low prep way to practice lists of vocabulary over and over. 


We then practiced our direction words as a whole group and then in pairs using worksheets and tiny chancla erasers a second grade teacher loaned me. 


Next up, the students practiced with the virtual beebots. I would tell them where I wanted to go and they had to give directions in Spanish and program their beebot to get there. This time really allowed them to experiment and see how the beebot responded. It also helped that they had played with the beebots in English with the STEM lab teacher!


Finally it was time to play with the beebots! First we sat in a circle and just used one map and one beebot. Everyone wrote their directions and I picked one student to program the beebot. If they didn't make it, then we troubleshooted as a group to debug the code. 


The next class the students worked in groups of four. Like in whole group, everyone wrote their directions and I rotated who got to program the beebot so that everyone got a turn. Having lots of visuals and a set order of who did what really helped mitigate any arguments (though we did have couple.) 


The map I use is no longer available but here is a link to the same site I got it from originally. 

After finishing up with the beebots we have moved on to designing our own communities and drawing maps to put in our interactive notebooks. But more on that later!

Have you used beebots or coding in your room before? Share in the comments below!

Sunday, November 12, 2023

Amate Bark Paintings in Spanish class

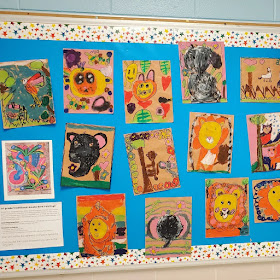
First grade recently finished our Animals Around Us unit, culminating in students creating an Amate bark painting inspired artwork! 


In this unit students learned how to say which animals they liked as well as to describe their size, color, speed, and how they move. I will do a separate post where I share what I used for the bulk of the unit - introducing animal names, practicing movements, looking at zoo maps and webcams, etc. In this post though I want to share how we compared and contrasted amate bark paintings and alebrijes from Mexico and then made our own amate inspired artwork.

We watched these videos to learn more about how alebrijes and amate paintings are made. 


I also have an amate painting and some mini alebrijes that I purchased online that students could see in person. We also looked at several photos from the internet as well. 


Because this wasn't the main focus of each class period, it did take us awhile to get done. We spent the last 10 minutes of class each time, working on something related to our artwork. First, I had students practice drawing their animals on whiteboards first. I bought drawing guides for zoo animals off TPT and projected them onto the board for them to follow. I modeled and gave directions in Spanish. After one class of practicing, I gave them their paper and we drew with pencil. 


The third class period they went over their pencil with sharpie markers. I can't JUST have them doing art and chatting in English so while they were working, I asked questions in Spanish about which animals were big or small, which animals walk or swim, etc. What animals did they like? 

The last two classes we used kwik sticks borrowed from the art room to paint. Students had to come up and tell me in Spanish which color they were taking. 


Some things for the future:

-Drawing first on the white boards really helped my first grade students practice with the drawing guides and how to follow the step by step pictures. This is a skill not all 6-7 year olds know how to do so it was an important step. 

-The kwik paint sticks were great for clean up in the Spanish room but they are kind of hard for this age to use well. I might use construction paper crayons or send them to art class to paint with real paint and paintbrushes next year. Or oil pastels. 

-There are a TON of resources and activity ideas on Pinterest. Some have students crumple their paper or tear the edges to give it more of a homemade paper look. One blog I read mentioned touching up the sharpie and adding dots and other lines as small details later, which I think I might incorporate next year, especially if I coordinate with the art teacher to have them work on them some in her room.


Do you incorporate art in your Spanish classroom? Share in the comments below and don't forget to check out my other art-inspired posts!